***This is the process that works for me, Feel free to make any changes you see fit.
**The RSA Keys in this are pulled from the WPEngine article I used to figure out this process.
*Before this process I would suggest copying the live site down to your local using duplicator pro. To make sure it works make sure you make these changes :
Packages > Basic Settings > Archive Engine > Change to Dup Archive
Packages > Advanced Settings > Installer Name > change to installer.ph1
-Copy files into root folder and change .ph1 back to .php
STEP 1: ADD YOUR SSH KEY TO USER PORTAL
The first step to enabling git on your WP Engine site is to add your SSH Key to the User Portal. SSH Keys cast aside traditional username and password and opt instead for a public and private key pair for authentication.
GENERATE SSH KEY PAIR
If you don’t already have an SSH key, use the steps below to generate your public/private key pair:
- Open a Terminal window (on Mac you can use the Spotlight utility and type “Terminal”), or Git Bash for Windows.
- Use ssh-keygen to generate a new key as shown below
ssh-keygen -t rsa -b 4096 -C “your_email@example.com”
- Type a secure passphrase when prompted

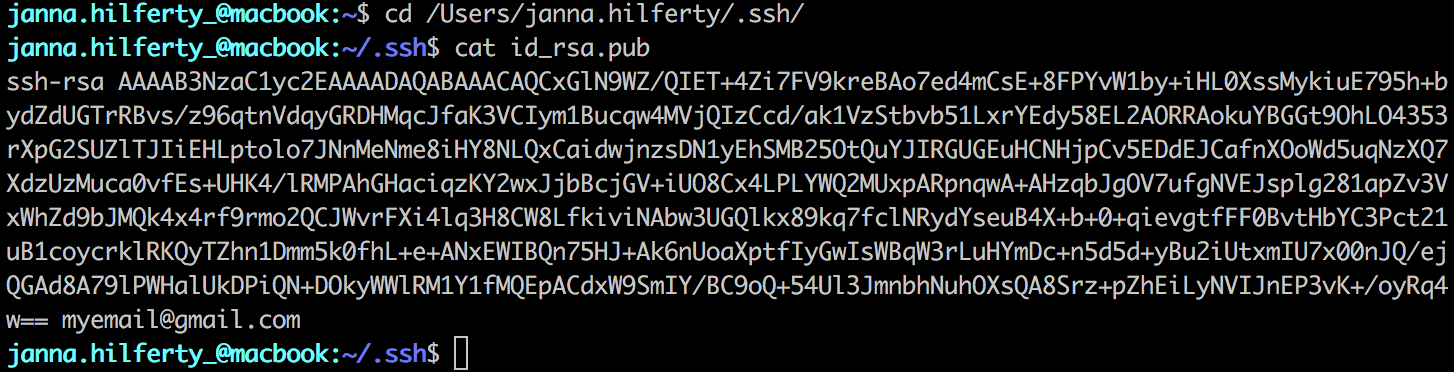
Doing this will generate your public/private key pair. In the output you should see text that indicates where your public key has been saved. Navigate in Terminal to this location and copy the text of your id_rsa.pub file.
ADD SSH KEY TO USER PORTAL
Now that you have your SSH public key copied, navigate to your User Portal. Click the environment to which you would like to connect to get to the Overview page for that environment. Then click Git push from the left-hand navigation.
**Whatever you make your developer name will be used on all projects so it’d be best to give it a generic name**
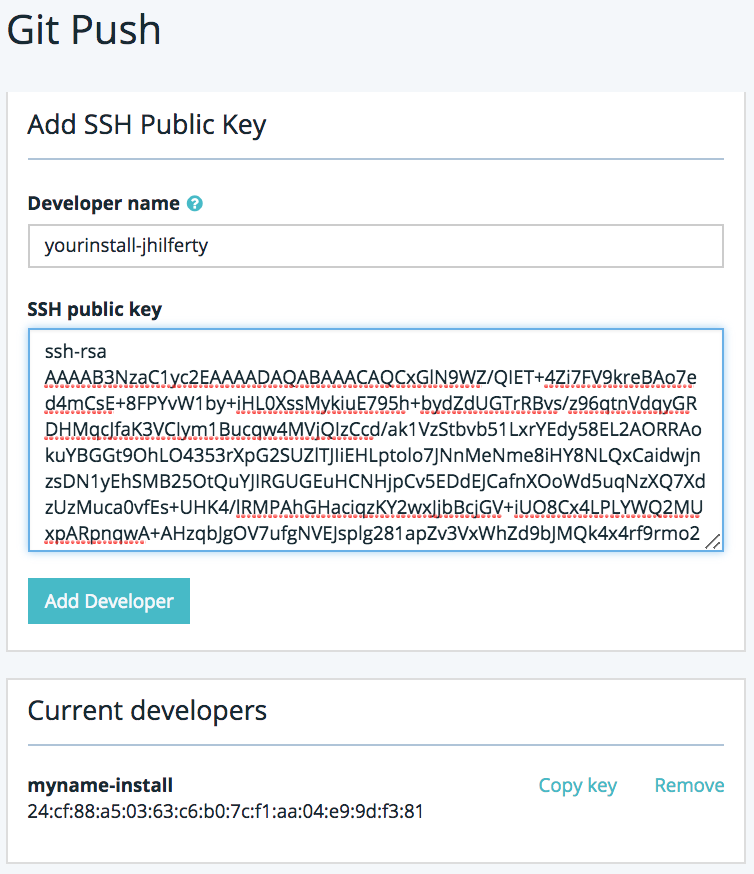
Here, you will be able to add the public key to your User Portal. Paste the contents of your public key in the box and create a developer name, then click the Add Developer button. Please note: Your key will be effectively published approximately 30-45 minutes after saving. In the meantime you will see an error if you try to connect to git in the following steps.
Be sure to add the public key for all environments in your site for which you wish to use git. After you have added the key to one environment, you will see a banner when adding it to other environments indicating the key is already in use. Click yes in the banner to add the existing key to your other environment(s).

STEP 2: SETUP .GITIGNORE FILE
**.gitignore will be in theme folde,r move it to the root folder**
The next step is to configure a .gitignore file on your local machine, which will define which files and folders should never be edited and pushed via git. Below we have provided two templates for your .gitignore file, to which you are free to add any of your own site-based exclusions if needed.
- .gitignore I have used https://docs.google.com/document/d/1Pmz9TxusD68F6KcqrjYpBLxeBIbs5VzlFJwWY1zrTPY/edit?usp=sharing
Download the starter .gitignore template of your choice, add any other files that should be ignored, and move it into the folder on your local machine where you will be managing your git repository. Place it in the root directory of your local copy of your website.
STEP 3: CONFIRM GIT ACCESS
If it has been at least 30 minutes since adding your SSH public key to User Portal, you may now test to confirm your user has access to git for your environment. Copy the command below into your Terminal, Git Bash, or PuTTY window:
ssh git@git.wpengine.com info
If you have never connected to git on WP Engine before, you will be prompted to verify host authenticity before connecting.
ssh git@git.wpengine.com info
The authenticity of host ‘git.wpengine.com (<no hostip for proxy command>)’ can’t be established.
ECDSA key fingerprint is SHA256:Jgp8bPftGbM0rzQaeA7KTBrZa1UfEN1nqQMLIwu5i18.
Are you sure you want to continue connecting (yes/no)?
The WP Engine host fingerprints are:
- RSA 19:17:ee:d2:1d:8d:c9:3e:dc:3e:0d:21:a7:c6:52:fc
- ECDSA 0c:4b:07:92:dd:e0:be:50:90:7d:0d:c3:30:56:fa:9a
- ECDSA SHA256 Jgp8bPftGbM0rzQaeA7KTBrZa1UfEN1nqQMLIwu5i18
If the host fingerprint matches the above, type yes to continue connecting. You will receive a message indicating git.wpengine.com was added to your known hosts. This does not indicate a successful connection. It simply means your local machine will remember that git.wpengine.com is an accepted host with a valid fingerprint.
Warning: Permanently added ‘git.wpengine.com,’ (RSA) to the list of known hosts.
If your key is recognized by the git service on WP Engine, you will see a message showing a list environments to which your user has access:
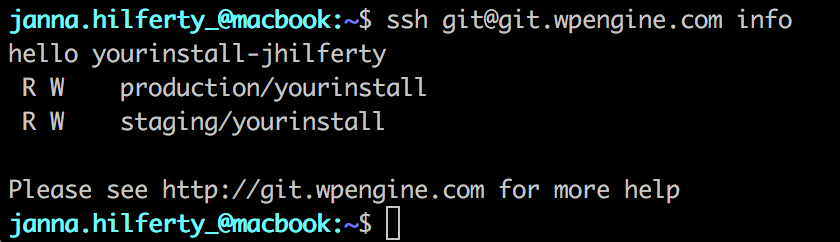
Please note: If you have added your public key to your production, staging, and development environments within a site you should see the environment name for each listed here (the “staging/yourinstall” entry for each environment refers to the legacy 1-Click Staging tool).
If not, you will see an error:
git@git.wpengine.com: Permission denied (publickey).
This error indicates that the git service does not recognize the key. This could mean you haven’t waited long enough for the key to be fully added (30-45 minutes), or that you are connecting with an incorrect key. If you have waited longer than 30-45 minutes, try creating an SSH config file to ensure your computer presents the right key to git.wpengine.com.
STEP 4: MAKE THE FIRST COMMIT
If your local copy of your site has not been used as a git repository before, you will need to make it into a repository by using the git init command.
cd ~/path/to/localcopy
git init .
Now that your copy is setup as a git repository, you can make your first commit. This will add all modified and new files (other than those in your .gitignore file) to git to be tracked. Since this is a new copy of your website that we’ve made into a git repository, all files will be “new” to git.
git add . –all
git commit -m ‘name of my first commit’
*If this doesnt work try using quotes “ “ instead
Note: At this point, nothing has changed on the front-end of your WP Engine environments. First we will need to setup remotes so we can use the git push command to deploy files.
STEP 5: ADD REMOTES
The next step is to map your local repository to the remote endpoints where you will deploy file changes on WP Engine. If you added your key to production, staging, and development environments within your site in the first step, you will need to add a remote for each of these environments.
cd ~/path/to/localcopy
git remote add work-env git@git.wpengine.com:production/work-env.git
**The steps for adding production env and staging are the same. The only thing that changes is the name of the env. Ex. deepwaterriser and deepwaterstage. This info can be found on the “git push” page of the project under git push overview.
In the above commands be sure to replace “site-work-env” with the User Portal names of each of these environments within your site. You may also name the “work-env” remote whatever you prefer–we suggest naming them according to their role in your site to avoid confusion (e.g. mysitename-production).
To confirm the remotes were successfully added, use the following command:
git remote -v
This will list all the remotes that were successfully added. Now that the remote endpoints for git have been established, you can perform a git push to deploy code changes.
STEP 6: DEPLOY WITH GIT PUSH
Last, it is time to deploy using the git push command. To deploy, type git push, followed by the name of the remote you would like to push, and then the name of the local branch you wish to push.
git push work-env master
The above command will push the local “master” branch to your remote endpoint named “production.” If you named the remote endpoint something else, be sure to replace “production” with that name instead (e.g. git push mysitename-production master).
And that’s it! WP Engine takes care of the rest once we receive your git push, syncing the changes to the applicable environment. Be sure to pay attention to your git push output, as it will indicate whether the push was successful or if it encountered any errors.